Introduction
The Chiavari chair is a classic piece of furniture that has been around for centuries. It originated in the Italian city of Chiavari in the late 18th century and has since become a popular choice for events and weddings around the world. The chair is known for its elegant design and its ability to be customized to fit any event. This article will explore the history of the Chiavari chair, from its origins in Italy to its current popularity around the world.
How the Chiavari Chair Became a Symbol of Italian Craftsmanship
The Chiavari chair is a symbol of Italian craftsmanship and elegance. It is a timeless piece of furniture that has been used in homes, restaurants, and event venues for centuries. The Chiavari chair was first created in the small Italian town of Chiavari in the early 19th century. It was designed by Giuseppe Gaetano Descalzi, a local cabinetmaker, who wanted to create a chair that was both lightweight and strong.
The Chiavari chair is made from a combination of beechwood and elmwood. The frame is constructed from beechwood, which is known for its strength and durability. The seat and back are made from elmwood, which is known for its flexibility and comfort. The chair is then finished with a lacquer to protect it from wear and tear.
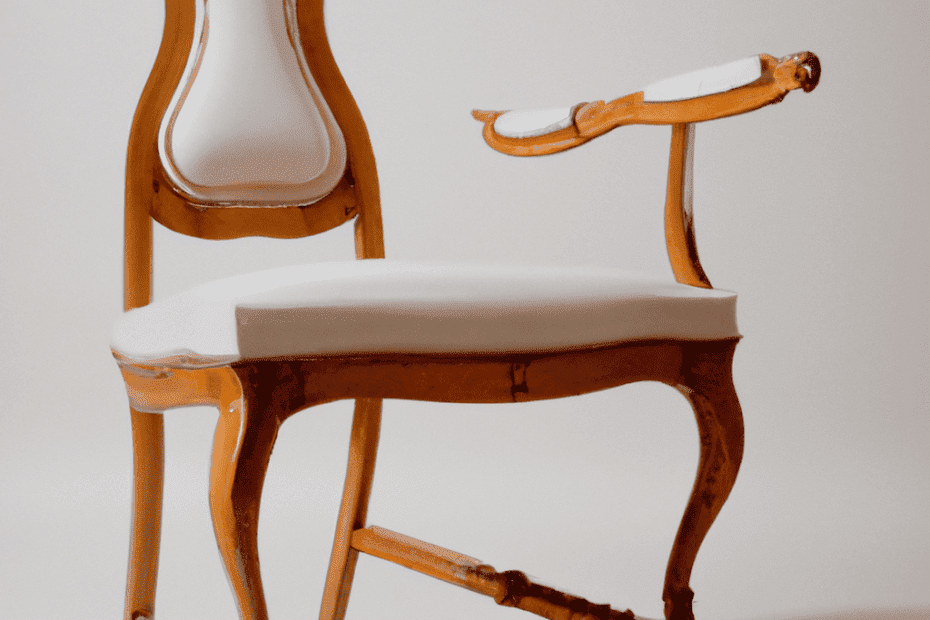
The Chiavari chair is known for its unique design. It has a curved back and a curved seat, which gives it a distinctive look. The legs are also curved, which adds to the chair’s elegance. The chair is also known for its intricate details, such as the carved woodwork and the hand-painted designs.
The Chiavari chair has become a symbol of Italian craftsmanship and elegance. It is a timeless piece of furniture that has been used in homes, restaurants, and event venues for centuries. The chair is a testament to the skill and dedication of Italian artisans, who have been creating beautiful furniture for generations. The Chiavari chair is a symbol of Italian craftsmanship and elegance that will continue to be admired for years to come.
The History of the Chiavari Chair: From its Inception in 1807 to its Popularity Today
The Chiavari chair is a timeless piece of furniture that has been in existence since 1807. It is a lightweight chair with a delicate design that has been used in a variety of settings, from formal events to everyday dining. The Chiavari chair has a long and interesting history, and its popularity continues to this day.
The Chiavari chair was first created in 1807 by a cabinetmaker from the Italian town of Chiavari. The chair was designed to be lightweight and elegant, and it quickly became popular among the wealthy and influential of the time. The chair was made from beechwood and featured a curved back and delicate legs.
The Chiavari chair was soon adopted by the Italian aristocracy, who used it in their homes and at formal events. The chair was also popular in France, where it was used in the court of Napoleon III. The chair was also used in the United States, where it was adopted by the wealthy and influential of the time.

The Chiavari chair continued to be popular throughout the 19th century, and it was used in a variety of settings. It was used in churches, schools, and even in the White House. The chair was also used in the homes of the wealthy, and it was often seen in the homes of the upper classes.
The Chiavari chair remained popular throughout the 20th century, and it was used in a variety of settings. It was used in restaurants, hotels, and even in movie theaters. The chair was also used in a variety of events, from weddings to corporate events.
Today, the Chiavari chair is still popular and is used in a variety of settings. It is often used in formal events, such as weddings and corporate events, but it is also used in everyday settings, such as restaurants and homes. The chair is still made from beechwood and features a curved back and delicate legs.
The Chiavari chair is a timeless piece of furniture that has been in existence since 1807. Its popularity has endured for centuries, and it continues to be used in a variety of settings. The chair is a classic piece of furniture that will never go out of style.
The Chiavari Chair: How it Evolved from a Simple Wooden Chair to a Luxury Furniture Piece
The Chiavari chair is a classic piece of furniture that has been around for centuries. It has evolved from a simple wooden chair to a luxurious piece of furniture that is used in many homes and businesses around the world.
The Chiavari chair was first created in the early 1800s in the Italian town of Chiavari. It was designed by Giuseppe Gaetano Descalzi, a local carpenter, and was originally made from beech wood. The chair was designed to be lightweight and stackable, making it easy to transport and store.
The Chiavari chair quickly became popular in Italy and soon spread to other parts of Europe. It was used in many different settings, from churches to homes. Over time, the design of the chair evolved to include more ornate details, such as carved legs and arms.
In the late 19th century, the Chiavari chair was introduced to the United States. It quickly became popular in the country, and was used in many different settings, from homes to businesses. The chair was often used in formal settings, such as weddings and other special occasions.

Today, the Chiavari chair is still a popular piece of furniture. It is often used in luxury settings, such as high-end hotels and restaurants. The chair is available in a variety of materials, including wood, metal, and plastic. It is also available in a variety of colors and finishes, making it easy to match any decor.
The Chiavari chair has come a long way since its creation in the early 1800s. It has evolved from a simple wooden chair to a luxurious piece of furniture that is used in many homes and businesses around the world. Its timeless design and versatility make it a popular choice for many different settings.
The Chiavari Chair: How it Spread from Italy to the Rest of the World

The Chiavari chair is a type of chair that has been popular for centuries, originating in the Italian city of Chiavari in the late 18th century. It is a lightweight, elegant chair that has become a staple of many events, from weddings to banquets. The Chiavari chair has spread from its Italian roots to become a popular choice for events around the world.
The Chiavari chair was first designed by Giuseppe Gaetano Descalzi, an Italian cabinetmaker from Chiavari. Descalzi was inspired by the chairs of the French Empire period, and he created a chair that was both lightweight and elegant. The chair was made of beechwood and featured a curved back and legs, as well as a woven cane seat.
The Chiavari chair quickly became popular in Italy, and it soon spread to other parts of Europe. It was particularly popular in France, where it was used in the court of Napoleon III. From there, it spread to the United States, where it was used in the White House and other prominent locations.
Today, the Chiavari chair is a popular choice for events around the world. It is often used in weddings, banquets, and other formal occasions. The chair is available in a variety of colors and styles, and it is often decorated with ribbons or other decorations.
The Chiavari chair has come a long way since its origins in Chiavari, Italy. It has become a popular choice for events around the world, and it is a symbol of elegance and sophistication. The Chiavari chair is a timeless classic that will continue to be a staple of events for years to come.
The Chiavari Chair: How it Became a Popular Choice for Weddings and Events
The Chiavari chair is a popular choice for weddings and events due to its elegant and timeless design. Originally designed in 1807 by Giuseppe Gaetano Descalzi, a cabinetmaker from Chiavari, Italy, the chair has become a staple in event and wedding décor.
The Chiavari chair is a lightweight chair made of solid beechwood, with a curved back and legs. It is available in a variety of colors and finishes, and can be customized with fabric or cushioning. The chair is also stackable, making it easy to store and transport.
The Chiavari chair has become a popular choice for weddings and events due to its versatility. It can be used to create a variety of seating arrangements, from formal to casual. The chair is also easy to decorate, allowing for a range of styles and colors to be used.
The Chiavari chair is also a popular choice for events due to its durability. The solid beechwood construction ensures that the chair will last for years, making it a great investment for any event.
The Chiavari chair is a timeless and elegant choice for any wedding or event. Its versatility, durability, and ease of decoration make it a popular choice for any occasion. With its classic design, the Chiavari chair is sure to be a timeless addition to any event.
The Chiavari Chair: How it Has Been Used in Interior Design for Decades
The Chiavari chair is a classic piece of furniture that has been used in interior design for decades. It is a lightweight, elegant chair that is often used in formal settings, such as weddings, banquets, and other special occasions. The chair is characterized by its delicate, curved lines and its intricate details.
The Chiavari chair was first designed in the early 19th century in the Italian town of Chiavari. It was originally crafted from beech wood and featured a simple, yet elegant design. Over the years, the design of the chair has evolved to include a variety of materials, such as rattan, bamboo, and even plastic. The chair is also available in a variety of colors and finishes, making it a versatile piece of furniture that can be used in a variety of settings.
The Chiavari chair has been used in interior design for decades. It is often used in formal settings, such as weddings, banquets, and other special occasions. The chair is also popular in restaurants, hotels, and other public spaces. The chair is often used in combination with other furniture pieces, such as tables and sofas, to create a cohesive look.
The Chiavari chair is a timeless piece of furniture that has been used in interior design for decades. Its delicate, curved lines and intricate details make it a classic piece of furniture that can be used in a variety of settings. The chair is available in a variety of materials, colors, and finishes, making it a versatile piece of furniture that can be used to create a cohesive look in any space.
The Chiavari Chair: How it Has Been Used in Movies and Television
The Chiavari chair is a classic piece of furniture that has been used in movies and television for decades. It is a lightweight, elegant chair that is often used in formal settings. The chair has a distinctive design, with a curved back and slender legs. It is often seen in banquet halls, wedding receptions, and other formal events.
The Chiavari chair first appeared in the late 19th century in the Italian city of Chiavari. It was designed by Giuseppe Gaetano Descalzi, a local cabinetmaker. The chair quickly became popular in Europe and eventually made its way to the United States.
The Chiavari chair has been used in many movies and television shows over the years. It is often seen in period pieces, such as the classic film “Gone with the Wind” (1939). In the movie, the chairs are used in the grand ballroom of the Tara plantation. The chairs are also seen in the popular television series “Downton Abbey” (2010-2015). In the show, the chairs are used in the formal dining room of the Crawley family.
The Chiavari chair has also been used in more modern films and television shows. In the movie “The Great Gatsby” (2013), the chairs are used in the grand ballroom of Jay Gatsby’s mansion. The chairs are also seen in the television series “Mad Men” (2007-2015). In the show, the chairs are used in the offices of the Sterling Cooper advertising agency.
The Chiavari chair is a timeless piece of furniture that has been used in movies and television for decades. Its distinctive design and elegant style make it a popular choice for formal settings. Whether it is used in a period piece or a modern drama, the Chiavari chair adds a touch of sophistication to any scene.
The Chiavari Chair: How it Has Been Used in the Music Industry
The Chiavari chair has been a staple of the music industry for decades. It is a lightweight, stackable chair that is often used in concert halls, recording studios, and other music venues. The chair is known for its elegant design and its ability to be easily moved and stored.
The Chiavari chair was first designed in the early 19th century by Giuseppe Gaetano Descalzi, an Italian furniture maker. The chair was originally made of beechwood and featured a curved back and a curved seat. The chair was designed to be lightweight and stackable, making it easy to transport and store.
The Chiavari chair has been used in the music industry for many years. It is often used in concert halls and recording studios, as it is lightweight and easy to move around. The chair is also popular in music venues, as it is comfortable and provides good back support.
The Chiavari chair is also used in music videos and live performances. It is often used to create a certain atmosphere or to add a touch of elegance to a scene. The chair is also used in music videos to create a sense of intimacy between the artist and the audience.
The Chiavari chair is a versatile piece of furniture that has been used in the music industry for many years. It is lightweight, stackable, and comfortable, making it ideal for use in concert halls, recording studios, and other music venues. The chair is also popular in music videos and live performances, as it adds a touch of elegance and creates a sense of intimacy between the artist and the audience.
The Chiavari Chair: How it Has Been Used in the Fashion Industry
The Chiavari chair has been a staple of the fashion industry for decades. Its elegant design and versatility have made it a popular choice for fashion shows, photo shoots, and other events.
The Chiavari chair was first designed in 1807 by Giuseppe Gaetano Descalzi, an Italian cabinetmaker. The chair was originally made of beechwood and featured a curved back and a delicate, tapered leg. Over the years, the design has evolved to include a variety of materials, including wood, metal, and plastic.
The Chiavari chair has been used in the fashion industry for a variety of purposes. It is often used as a seating option for fashion shows, as its light weight and stackable design make it easy to move and store. The chair is also popular for photo shoots, as its simple design allows it to blend in with any background. Additionally, the chair is often used as a prop in fashion editorials, as its classic design adds a touch of sophistication to any look.
The Chiavari chair has also been used in a variety of other ways in the fashion industry. It has been used as a display piece for clothing and accessories, as well as a backdrop for runway shows. Additionally, the chair has been used as a prop in fashion films and videos, as its classic design adds a touch of elegance to any scene.
The Chiavari chair has been a staple of the fashion industry for centuries. Its timeless design and versatility make it a popular choice for fashion shows, photo shoots, and other events. Its classic design adds a touch of sophistication to any look, making it a must-have for any fashionista.
The Chiavari Chair: How it Has Been Used in the Art World
The Chiavari chair is a type of chair that has been used in the art world for centuries. It is a lightweight, elegant chair that has been used in many different settings, from formal events to everyday use. The Chiavari chair has been used in the art world for a variety of purposes, from providing seating for art exhibitions to being used as a prop in theatrical performances.
The Chiavari chair was first designed in the early 19th century by Giuseppe Gaetano Descalzi, an Italian furniture maker. The chair was originally designed for use in the palaces of the Italian aristocracy, but it quickly became popular in other settings. The chair is made of lightweight wood, usually beech or walnut, and is characterized by its curved back and legs. The chair is often decorated with intricate carvings and inlays, and is available in a variety of colors and finishes.
In the art world, the Chiavari chair has been used in a variety of ways. It has been used as seating for art exhibitions, as a prop in theatrical performances, and as a decorative element in galleries and museums. The chair is often used to provide seating for guests at art openings and other events. It is also used to provide seating for lectures and presentations.
The Chiavari chair has also been used as a canvas for artists. Many artists have used the chair as a medium for their work, painting and decorating it with their own designs. This has allowed artists to create unique pieces of art that can be displayed in galleries and museums.
The Chiavari chair has been used in the art world for centuries, and it continues to be a popular choice for many different settings. Its lightweight design and elegant style make it a versatile piece of furniture that can be used in a variety of ways. Whether it is used as seating for an art exhibition or as a canvas for an artist’s work, the Chiavari chair is sure to add a touch of sophistication to any setting.
Q&A
1. What is a Chiavari Chair?
A Chiavari Chair is a lightweight, elegant chair with a distinctive design that originated in the Italian city of Chiavari in the early 19th century.
2. Who invented the Chiavari Chair?
The Chiavari Chair was invented by Giuseppe Gaetano Descalzi, a cabinetmaker from Chiavari, Italy.
3. When was the Chiavari Chair first produced?
The Chiavari Chair was first produced in 1807.
4. What materials are used to make a Chiavari Chair?
Chiavari Chairs are typically made from beechwood, although other woods such as walnut, cherry, and mahogany are also used.
5. How has the design of the Chiavari Chair evolved over time?
The design of the Chiavari Chair has evolved over time to include a variety of styles and finishes. Today, Chiavari Chairs are available in a range of colors, fabrics, and finishes.
6. What is the purpose of a Chiavari Chair?
Chiavari Chairs are typically used for formal occasions such as weddings, banquets, and other special events.
7. Where are Chiavari Chairs manufactured?
Chiavari Chairs are manufactured in Italy, as well as in other countries such as the United States, China, and India.
8. How much do Chiavari Chairs typically cost?
The cost of a Chiavari Chair can vary depending on the materials used and the quality of the craftsmanship. Generally, Chiavari Chairs range in price from $50 to $500.
9. What is the difference between a Chiavari Chair and a folding chair?
The main difference between a Chiavari Chair and a folding chair is that a Chiavari Chair is designed to be lightweight and elegant, while a folding chair is designed to be more utilitarian and practical.
10. What is the most popular use for Chiavari Chairs?
The most popular use for Chiavari Chairs is for weddings and other formal events. They are also often used in restaurants, hotels, and other venues.
Conclusion
The History of Chiavari Chairs has been an interesting journey, from its humble beginnings in Italy to its current status as a popular seating choice for events around the world. Chiavari Chairs have become a symbol of elegance and sophistication, and their timeless design has made them a favorite of many. With their unique style and versatility, Chiavari Chairs are sure to remain a popular choice for many years to come.
- how to paint chiavari chairs - April 8, 2024
- how to make chiavari chairs - April 8, 2024
- how to decorate chiavari chairs - April 8, 2024